Android应用开发-快速入门

内容摘要

  • 了解Android 操作系统
  • 搭建Android 开发工具
  • 使用Android 模拟器
  • 案例-电话拨号器/短信发送器
  • 掌握点击事件的四种实现方式
  • 掌握Android 常见布局
  • 了解Android 中的长度单位

1. 手机制式

手机的发展根据通信技术大致可以划分为4 个时代(G:Generation 的缩写)

第一代模拟制式手机(1G):1G就是大哥大,手机类似于简单的无线电双工电台,通话是锁定在一定频率,所以使用可调频电台就可以窃听通话
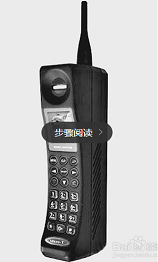
android开发

第二代GSM、CDMA等数字手机(2G):手机使用PHS,GSM或者CDMA这些十分成熟的标准,具有稳定的通话质量和合适的待机时间,支持彩信业务的GPRS和上网业务的WAP服务,以及各式各样的Java程序等
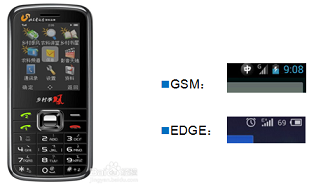
android开发

第三代移动通信技术(3G):3G,是英文3rd Generation的缩写,指第三代移动通信技术。指将无线通信与国际互联网等多媒体通信结合的新一代移动通信系统。它能够处理图像、音乐、视频流等多种媒体形式,提供包括网页浏览、电话会议、电子商务等多种信息服务

android开发

第四代移动电话行动通信(4G):4G。该技术包括TD-LTE和FDD-LTE两种制式。4G是集3G与WLAN于一体,并能够传输高质量视频图像,它的图像传输质量与高清晰度电视不相上下。4G系统能够以100Mbps的速度下载,比目前的拨号上网快200倍,并能够满足几乎所有用户对于无线服务的要求。此外,4G可以在DSL和有限电视调制解调器没有覆盖的地方部署,然后再扩展到整个地区
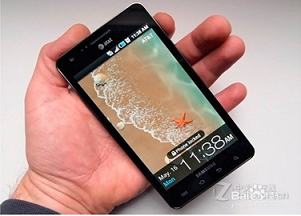
android开发

1G制式:彻底退出历史舞台……

2G/3G/4G的区别:网速的区别。

2G:打个电话给你:“我租了一张苍老师的VCD,一起来看”。

3G:发个消息给你:“种子发你邮箱了,注意查收,请叫我雷锋”。

4G:发个地址给你:“在线看,高清的,还能边看边吐槽”。

2G 拨号上网,带宽12.2k每用户。

3G 宽带上网,带宽384k~2M每用户。

4G 光纤到户,带宽可以达到100M每用户。

1.1 买手机注意网络制式

  • 2G制式:
    • GSM:移动/联通
    • CDMA:电信
  • 3G制式
    • WCDMA:联通
    • TD-SCDMA:移动
    • CDMA 2000:电信
  • 4G制式
    • FDD-LTE:电信/联通
    • TD-LTE(3个版本,对应三大运营商,互不兼容):移动/电信/联通

2. Android简单历史

2.1 安卓之父:安迪·鲁宾

img

2003年10月,安迪·鲁宾牵头创建了一家公司,名为Android,开始开发一款针对手机端的操作系统。
2005年8月,谷歌低调收购了这家公司及其团队,安迪·鲁宾成为Google公司工程部副总裁,继续负责Android项目。
2007年11月,谷歌公司正式向外界展示了这款名为Android的操作系统,并宣布建立一个全球性的联盟组织,该组织由34家手机制造商、软件开发商、电信运营商以及芯片制造商共同组成,他们共同搭建起了Android系统最早的生态圈。
2011年,Android在全球的市场份额首次超过塞班系统,跃居第一,目前的主要竞争对手是iOS。

2.2 Android进化史

img

  • 2008 年9 月23 日Android 1.0 发布,代号Bender(发条机器人),这也是Android 系统最早的版本
  • 2009 年9 月15 日Android 1.6 发布,代号Donut(甜甜圈)该版本首次支持了CDMA 网络
  • 2009 年11 月Android 2.0 发布,代号Eclair(松饼)无论从哪个方面说,它都是Android 发展历史上第二个重要的里程碑时刻(第一个是Android1.5)
  • 2010 年5 月20 日Android 2.2 发布,代号Froyo(冻酸奶)为Android 添加了很多企业级功能
  • 2011 年10 月19 日Android 4.0 发布,代号Ice Cream Sandwich(冰激凌三明治)是Android 发展历史上最重大的一次升级
  • 2012 年6 月28 日Android 4.1 发布,代号Jelly Bean(果冻豆)是谷歌继蜂巢之后,一次全新的平板策略尝试
  • 2014 年10 月15 日Android 5.0 发布,代号Lollipop(棒棒糖),全新的UI 设计,全新的操作系统
  • 2015 年10 月6 日Android 6.0 发布,代号Marshmallow(棉花糖),这次的新版系统在UI 和交互上和Android 5.X 保持高度一致
  • 2016年5月19日,谷歌在美国加州的山景城举办了 Google I/O 开发者大会中发布。2016年6月,Android N正式命名为“牛轧糖”

3. Android体系结构

Android 的系统架构采用了分层的设计。从架构图看,Android 分为四层,从低层到高层分别是Linux 内核层、系统运行库层、应用程序框架层和应用程序层
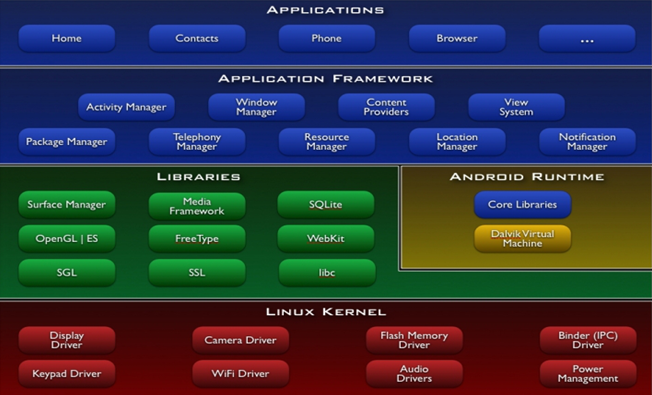
img

3.1 LINUX KERNEL

Linux核心,Android系统是基于Linux系统修改过来的,Android底层都是Linux的东西,大多都是操作硬件的一些驱动,如Display Driver、Audio Drivers等,Linux 内核也同时作为硬件和软件栈之间的抽象层

3.2 LIBRARIES

用C语言编写的完成Android核心功能的一些类库,这些库能被Android 系统中不同的组件使用。它们通过Android 应用程序框架为开发者提供服务

  • OpenGL|ES(图形图像引擎简化版)
  • WebKit(浏览器内核)
  • SQLite(轻量级数据库)
  • Surface Manager(界面管理器)
  • Media Framework(多媒体框架)
  • FreeType(字体类库)
  • SGL(另一个图形图像引擎)
  • SSL(基于TCP的安全协议)
  • libc(零散的类库)

3.3 Android Runtime

  • Core Libraries - 该核心库提供了Java 编程语言核心库的大多数功能

  • Dalvik Virtual Machine
    Android底层是Linux系统,使用C、C++语言编写的,所以Android程序(Java语言编写)要在Linux上运行就需要虚拟机,也就是DVM。每一个Android 应用程序都在它自己的进程中运行,都拥有一个独立的Dalvik 虚拟机实例。Dalvik 虚拟机依赖于linux 内核的一些功能,比如线程机制和底层内存管理机制

3.4 APPLICATION FRAMEWORK

应用框架层,全部是用Java语言编写的,供开发人员调用。Android 系统中的每个应用都依赖于该框架提供的一系列服务和系统,其中包括:

  • 活动管理器( Activity Manager) 用来管理应用程序生命周期并提供常用的导航回退功能。
  • 丰富而又可扩展的视图(Views),可以用来构建应用程序, 它包括列表(lists),网格(grids),文本框(textboxes),按钮(buttons),甚至可嵌入的web 浏览器。
  • 内容提供器(Content Providers)使得应用程序可以访问另一个应用程序的数据(如联系人数据库), 或者共享它们自己的数据。
  • 资源管理器(Resource Manager)提供非代码资源的访问,如本地字符串,图形,和布局文件( layoutfiles )。
  • 通知管理器(Notification Manager) 使得应用程序可以在状态栏中显示自定义的提示信息。

3.5 APPLICATIONS

应用层,我们安装的所有应用都属于这一层,如,微信,植物大战僵尸。该层不仅包括系统内置的应用也包括用户自己安装的应用,比如email 客户端,SMS短消息程序,日历,地图,浏览器,联系人管理程序,QQ,微信,淘宝,美团等,该层所有的应用程序都是使用Java语言编写的

3.6 举例:闹钟应用

闹钟应用的功能实际上就是定时播放音乐。闹钟应用调用APPLICATION FRAMEWORK层的MediaPlayer,MeidaPlayer访问LIBRARIES层中的Media Framework,Media Framework再使用C语言操作Andio Drivers去播放音乐

4. Dalvik VM和JVM的比较

JavaSE 程序使用的虚拟机叫Java Virtual Machine,简称JVM,Android 应用也使用Java 语言开发,但是使用的虚拟就是Dalvik Virtual Machine,简称DVM。

Dalvik 是Google 公司自己设计用于Android 平台的Java 虚拟机。它执行的是已转换为.dex(即Dalvik Executable)格式的Java 应用程序的运行,.dex 格式是专为Dalvik 设计的一种压缩格式,适合内存和处理器速度有限的系统。

Dalvik 经过优化,允许在有限的内存中同时运行多个虚拟机的实例,并且每一个Dalvik 应用作为一个独立的Linux 进程执行。独立的进程可以防止在虚拟机崩溃的时候所有程序都被关闭。

img

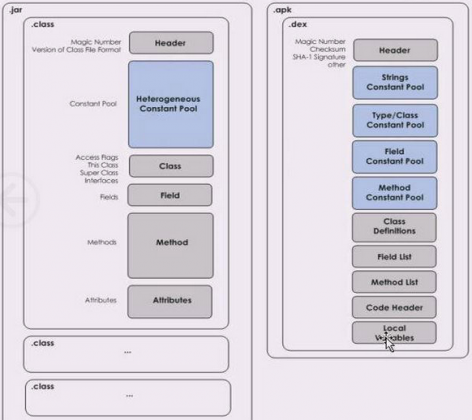
DVM执行的是.dex格式文件,JVM执行的是.class格式文件。Android程序编译完之后生成.class文件,然后,dex工具会把.class文件处理成.dex文件,然后把资源文件和.dex文件等打包成.apk文件,apk就是android package的意思。
img

4.1 DVM相比JVM运行效率更高的原因

  • 每个jar包中都会有很多的class文件,每个class文件都有一个Header,Header中保存了class文件的初始信息,如,生成该class的jdk版本。而在apk文件中的dex文件,只有一个Header,所有class文件的初始信息都保存在其中,效率更高
  • 每个class文件中有常量、字节码、方法、域等保存自己的对应的信息。dex文件中把所有class文件中的常量放在常量池中,所有class文件中的字节码放到一个字节码常量池中,等等。虽然这样打包慢一点,但是读取的时候会很快。
  • class文件存在很多的冗余信息,dex工具会去除冗余信息,并把所有的.class文件整合到.dex文件中,减少了I/O操作,提高了类的查找速度。

4.2 Dalvik 和标准Java 虚拟机(JVM)首要差别

Dalvik 基于寄存器,而JVM 基于栈。基于寄存器的虚拟机对于编译后变大的程序来说,在它们执行的时候,花费的时间更短。

Dalvik 和Java 运行环境的区别:

  • Dalvik 主要是完成对象生命周期管理,堆栈管理,线程管理,安全和异常管理,以及垃圾回收等重要功能
  • Dalvik 负责进程隔离和线程管理,每一个Android 应用在底层都会对应一个独立的Dalvik 虚拟机实例,其代码在虚拟机的解释下得以执行
  • 不同于Java 虚拟机运行Java 字节码,Dalvik 虚拟机运行的是其专有的文件格式Dex
  • dex 文件格式可以减少整体文件尺寸,提高I/O 操作的类查找速度
  • odex 是为了在运行过程中进一步提高性能,对dex 文件的进一步优化
  • 所有的Android 应用的线程都对应一个Linux 线程,虚拟机因而可以更多的依赖操作系统的线程调度和管理机制
  • 有一个特殊的虚拟机进程Zygote,他是虚拟机实例的孵化器。它在系统启动的时候就会产生,它会完成虚拟机的初始化,库的加载,预制类库和初始化的操作。如果系统需要一个新的虚拟机实例,它会迅速复制自身,以最快的数据提供给系统。对于一些只读的系统库,所有虚拟机实例都和Zygote 共享一块内存区域
  • Dalvik 是由Dan Bornstein 编写的,名字来源于他的祖先曾经居住过名叫Dalvík 的小渔村,村子位于冰岛

4.3 Android的新虚拟机ART

  • ART 模式是什么?

ART 模式英文全称为:Android runtime,谷歌从Android 4.4 系统开始新增的一种应用运行模式,与传统的Dalvik 模式不同,ART 模式可以实现更为流畅的Android 系统体验。

在4.4 系统之前,Android 系统在Linux 的底层下构筑Dalvik 一层的虚拟机,通过其可以更好适应多样的硬件架构,开发者只需要按一套规则进行应用便可,无需因为不同的硬件架构而处理与底层的驱动关系,从而大大提高开发的效率,但因为应用均是运行在Dalvik 虚拟机中,因此应用程序每次运行的时候,一部分代码都需要重新进行编译,这过程需要消耗一定的时间和降低应用的执行效率,最明显的便是拖延了应用的启动时间和降低了运行速度。

  • ART 模式有什么作用?

ART 模式最大的作用就是提升了Android 系统流畅度,相比Dalvik 模式中出现的耗电快、占用内存大、即使是旗舰机用久了也会卡顿严重等现象,ART 模式中这种问题得到了很好的解决,通过在安装应用程序时,自动对程序进行代码预读取编译,让程序直接编译成机器语言,免去了Dalvik 模式要时时转换代码,实现高效率、省电、占用更低的系统内存、手机运行流畅。

  • ART 模式的缺点

ART 模式可以降低手机硬件配置要求,减少RAM 内存依赖,不过在安卓4.4 系统中,安装应用的时间比安卓4.4 以下版本系统更长,这主要由于应用安装过程中需要先执行编码导致,并且安装应用更占存储空间(ROM)

Android 5.0以上版本的手机正式开始使用ART

4.4 DVM和ART虚拟机的区别

Dalvik:应用程序每次运行的时候,字节码都需要通过即时编译器转换为机器码,这会拖慢应用的运行效率。

ART:应用在第一次安装的时候,字节码就会预先编译成机器码(java语言翻译成C指令),使其成为真正的本地应用,应用的启动和执行速度都会显著提升。弊端就是ART需要存储java和C两份指令,有些耗内存。
img

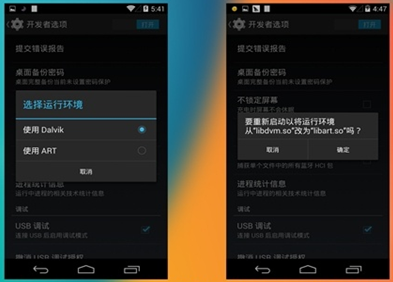
上图说明:进入开发者模式,选择运行环境切换。在切换至ART模式时,系统会重新启动,改变运行环境,需要等待程序优化完毕,即可。
img

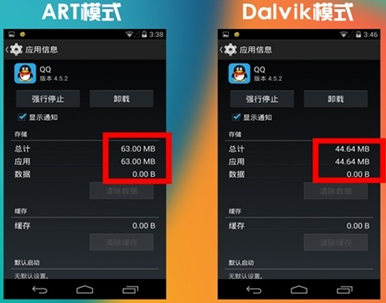
QQ实际占用内用内存,原本为44.64MB,ART模式下,变为63.00MB,说明ART有些耗内存(存两份指令)。

5. Android开发环境搭建

目前主流的开发工具有两个,一个是Eclipse 另外一个是Android Studio。Eclipse 需要和ADT(Android Develop Tool)插件整合后才能使用,不过Google 官方已经直接提供了Eclipse 和ADT 集成好的开发工具,叫ADT-Bundle,但是现在Google已经不再支持这种方式开发,已经完全转移到Android Studio平台

Android Studio 是Google 基于IntelliJ IDEA 开发的Android 集成开发工具,目前国内使用该开发工具的企业也越来越多。Android 基础阶段我们依然使用Eclipse 作为开发工具,在后面的课程中才会使用到Android Studio。

获取SDK工具包(Software development kits)下载地址Android首页Android中文版首页

工具包,包含以下内容:

  • Eclipse+ADT插件
  • Android SDK
  • Android Platform-tools
  • 最新的Android开发平台
  • 最新的模拟器镜像

Android Studio是一个Android开发环境,基于IntelliJ IDEA,类似Eclipse ADT,Android Studio提供了集成的Android开发工具用于开发和调试。

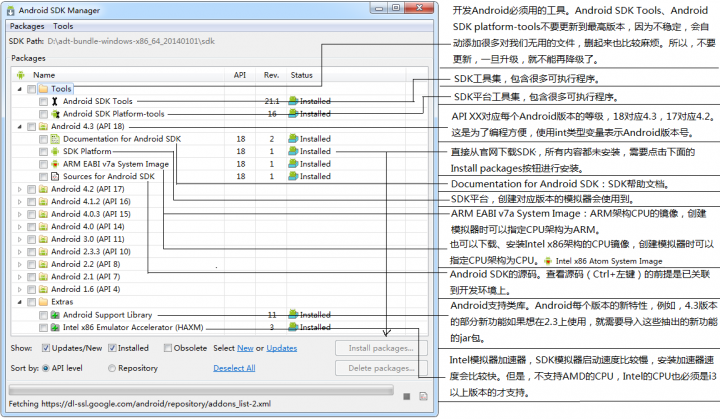
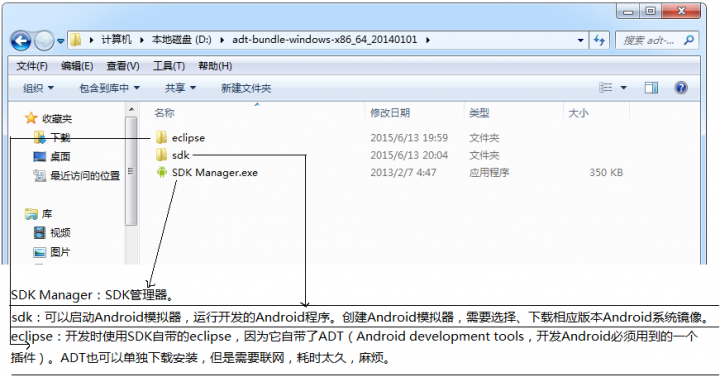
6. SDK目录结构
img

双击SDK Manager.exe。

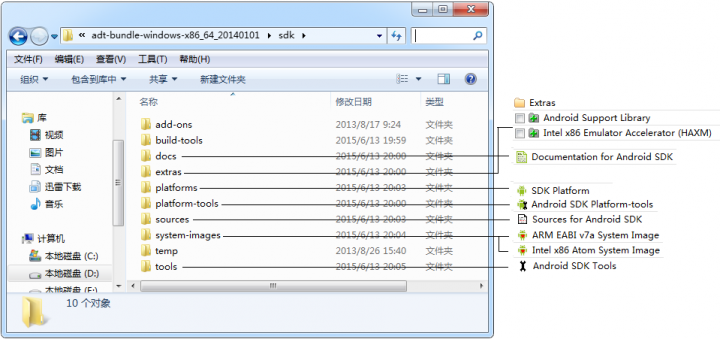
img

SDK文件夹目录结构(请对应上图查看):

img

  • add-ons文件夹中保存着附加库,比如Google Maps。
  • build-tools文件夹中保存着编译工具。
  • tools文件中只有少数指令需要我们手动调用,如,draw9patch.bat。
  • platform-tools文件夹中包含可执行程序和批处理文件,其中adb.exe很重要。
  • extras文件夹中v4表示最低可以支持到1.6版本,v7表示最低可以支持到1.7版本。
  • temp文件夹为临时目录。

docs文件夹中是SDK帮助文档,在线文档使用起来很不方便。但是,我们可以使用离线文档。双击sdk目录下的docs文件夹,双击此文件夹中的index.html,双击打开。然后,会等待很久,因为浏览器要去google服务器请求数据。如果请求不到,就会一直请求,直到超时。如果断网了,也就请求不到数据了

img

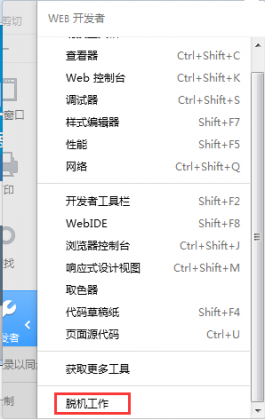
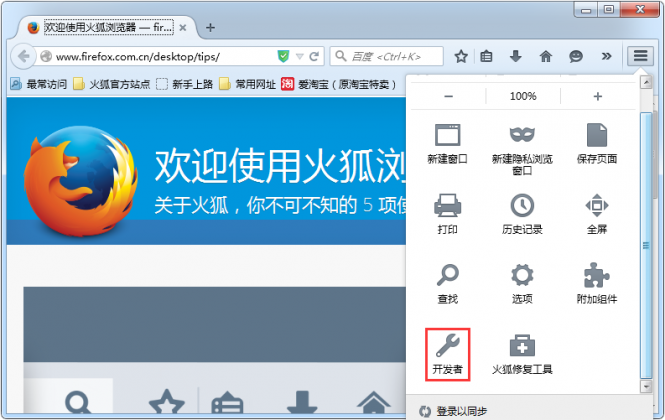
但是,我们可以脱机使用。步骤1、打开火狐,选择“开发者”–>“脱机工作”。
img

img

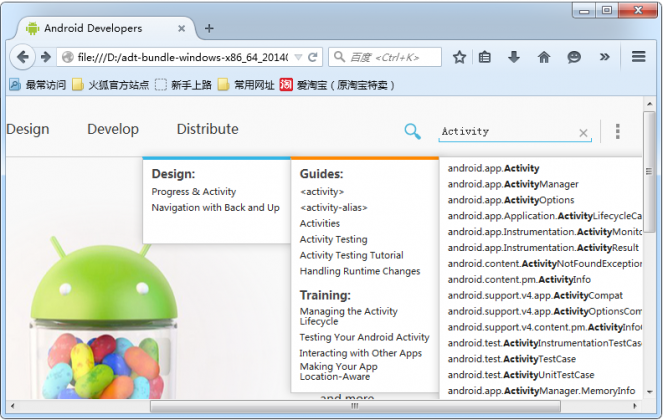
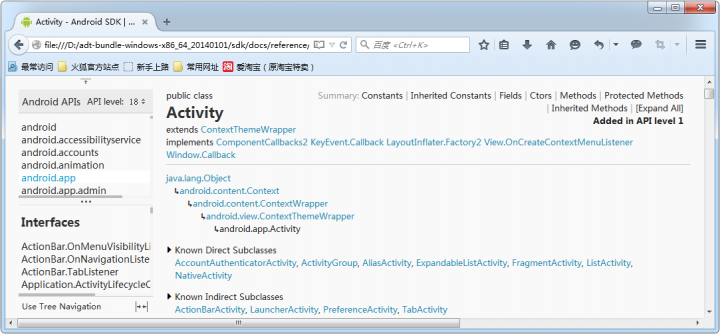
步骤2、打开SDK离线文档,可以搜索API。如,Activity。

img

img

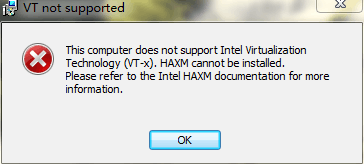
  1. 安装intel文件夹中的IntelHAXM.exe可能报错。如果报错为如下,说明本机不支持安装HAXM.exe,不用装了。
img

如果报错如下,说明本机支持,但是支持加速器的选项没有打开,去BIOS中打开即可。进入BIOS找到virtual technology选项,选择enable即可。

img

7. 模拟器的创建

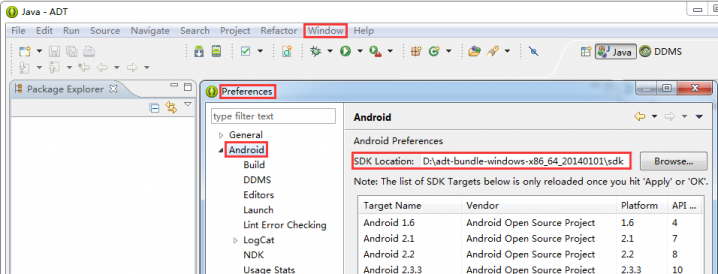
1、首先指定SDK的路径。

点击Windows–>preferences–>Android,默认指定正确的SDK路径。但是,如果以前装过SDK,那么就会指定旧的SDK,也就是错误的,手动更换成新的SDK路径即可。
img

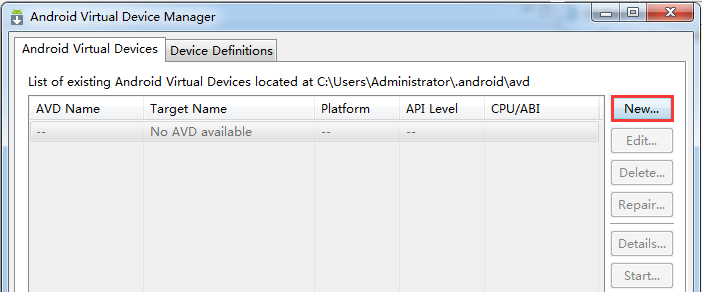
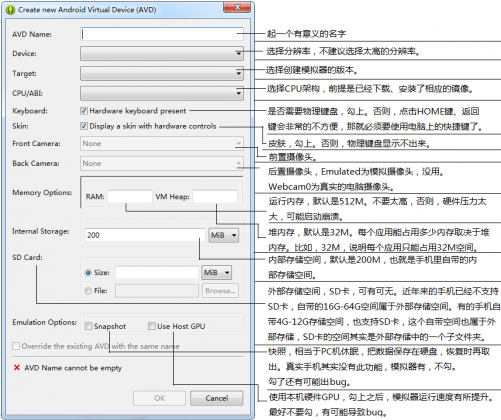
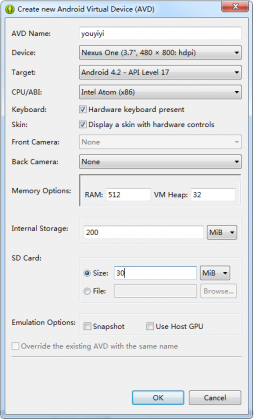
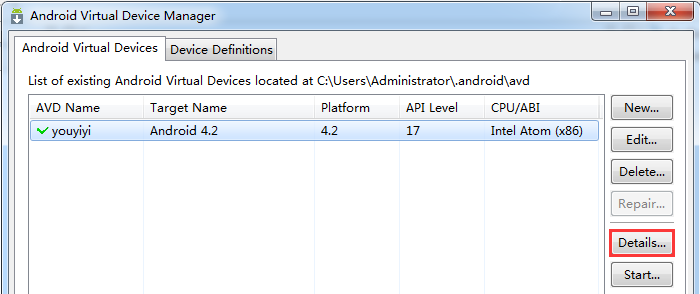
2、点击虚拟机管理器按钮–>点击New,创建模拟器。

img

img

img

img

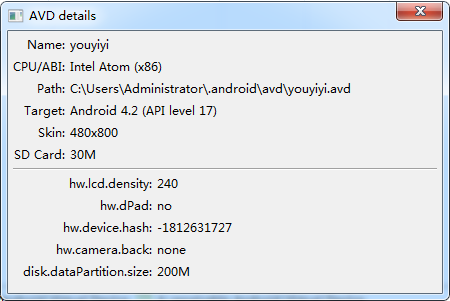
3、点击“detail”可以看到模拟器配置明细。

img

img

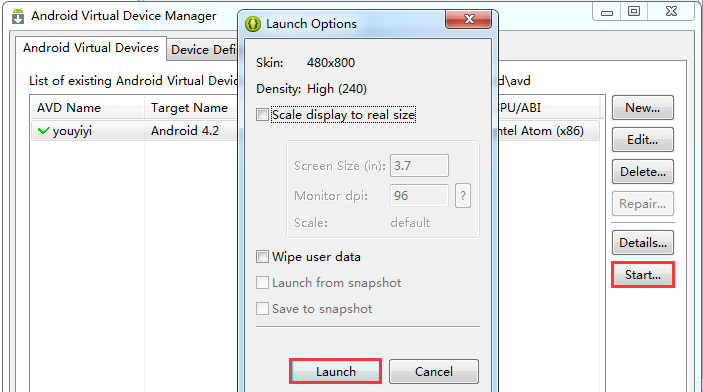
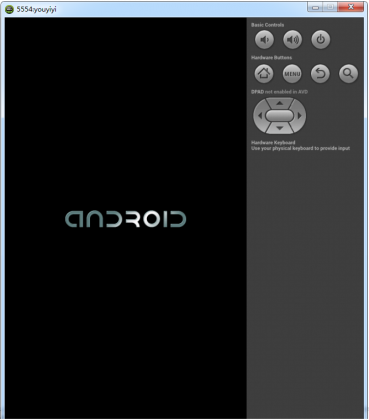
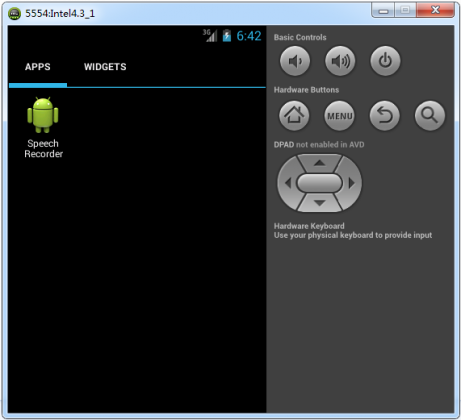
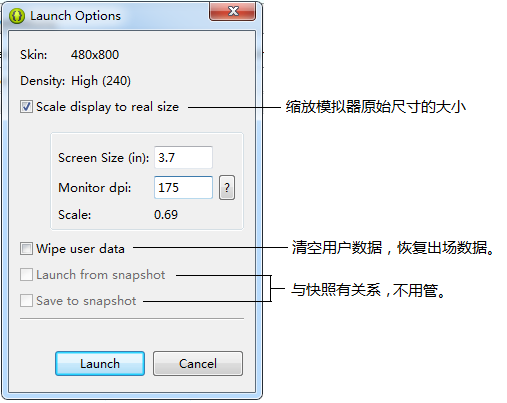
4、点击“Start”–>Launch,启动模拟器。

img

img

不建议使用这么大的分辨率,屏幕分辨率越大,启动越慢,最好用320*480的分辨率。
img

img

8. 创建Android项目

步骤1、右击–>New–>Android Application Project。
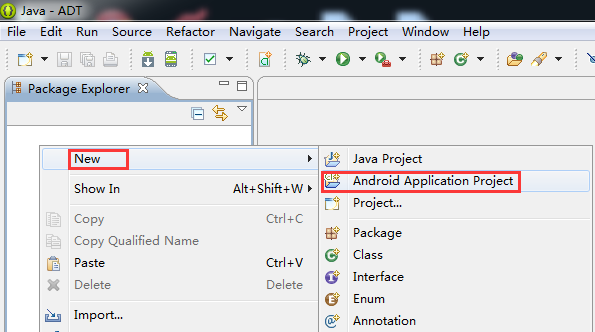
img

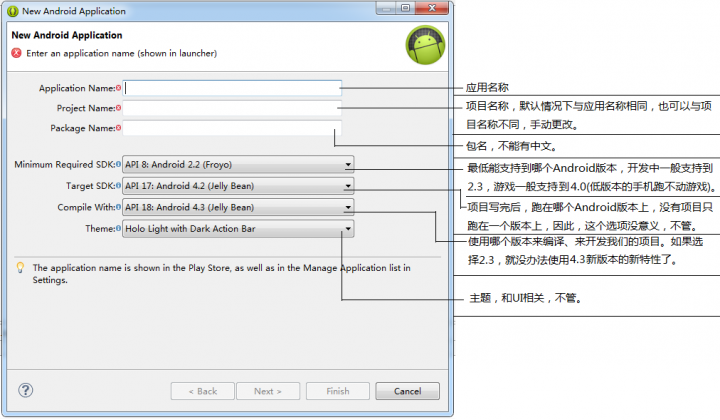
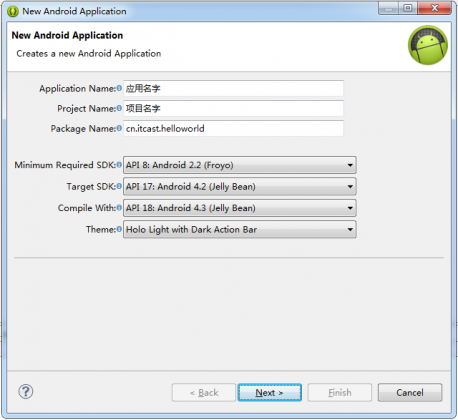
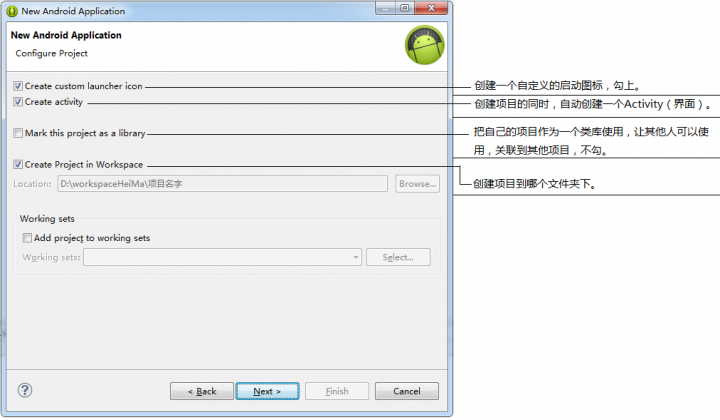
步骤二、设置Android项目参数。

img

img

img

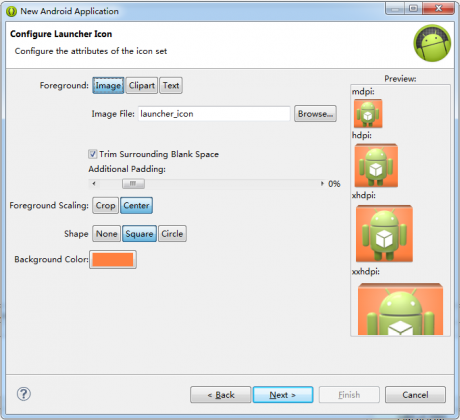
步骤三、设置应用图标。

img

步骤四、创建Activity。我们创建的时候都使用空白的Activity,需要什么效果,最好自己写。自动生成的Activity,很多自动生成的代码需要删除、修改,很麻烦。
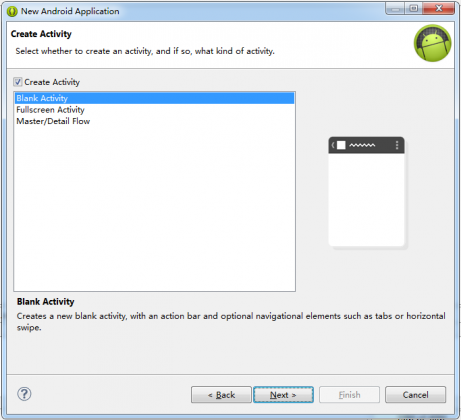
img

给Activity起个名字,一般就叫MainActivity,不需要修改。
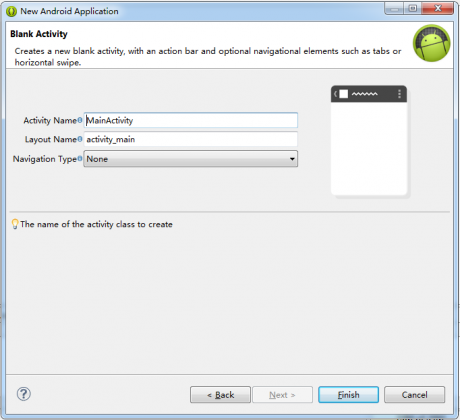
img

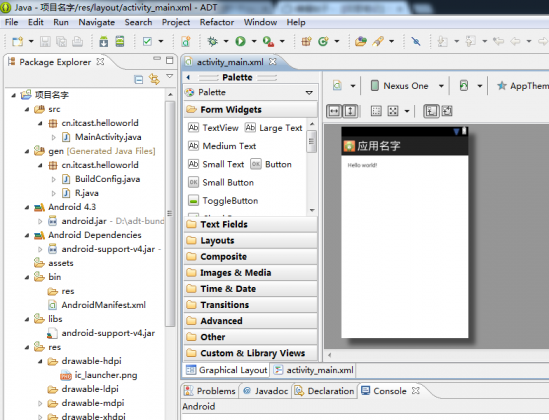
步骤五、生成项目成功。

img

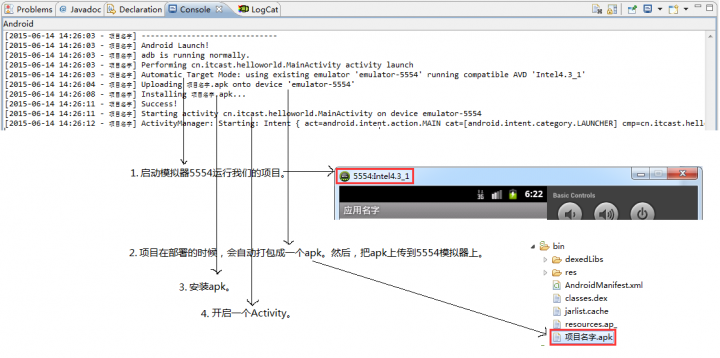
步骤六、空白项目也可以部署,运行。右击–>Run As–>Android Application。
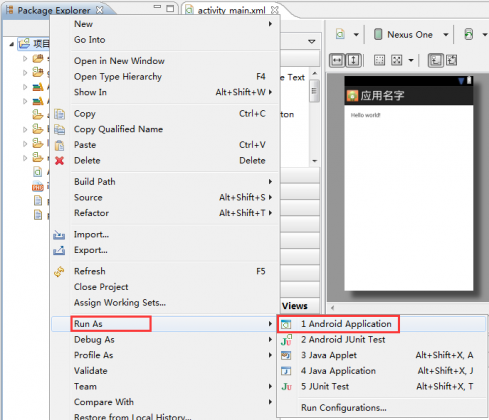
img

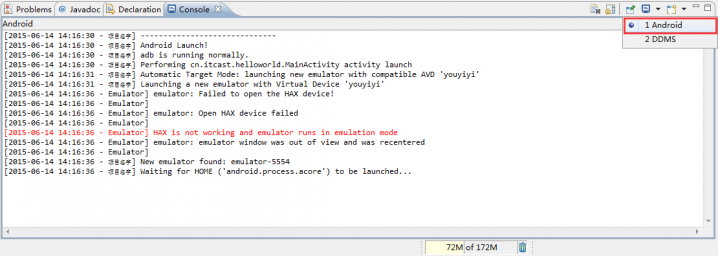
然后,此项目就会被部署到Android的模拟器上。选择Console中的Android选项卡,可以看到部署的状态。
img

img

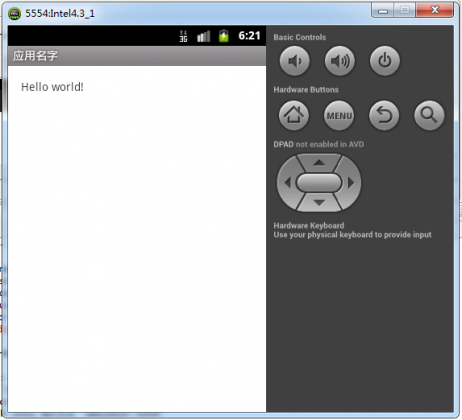
步骤七、运行成功。

img

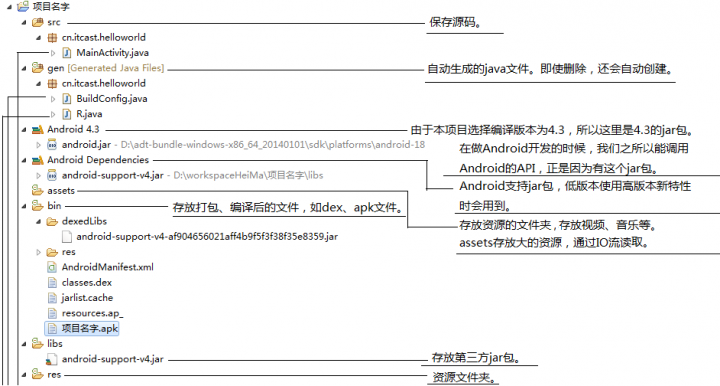
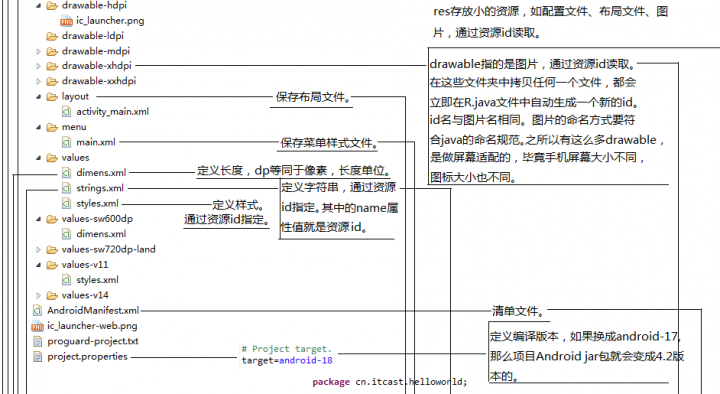
9. Android项目目录结构

img

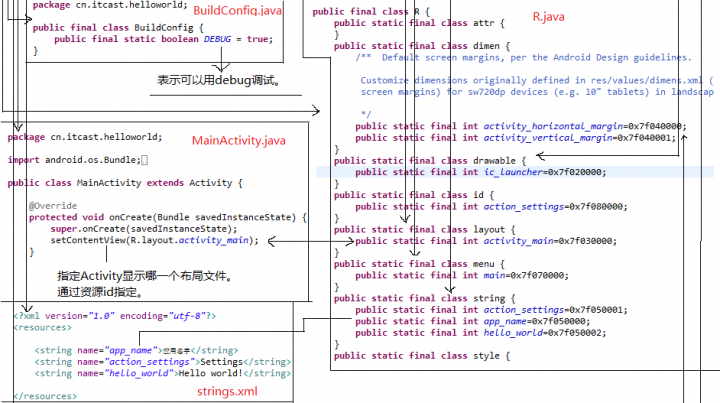
img

img

img

示例1:更改应用程序图标、名称。

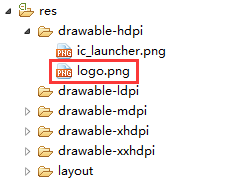
  1. 将图标存入drawable-hdpi文件夹中。

img

  1. 查看R.java文件,可以看到生成了相应的id。

img

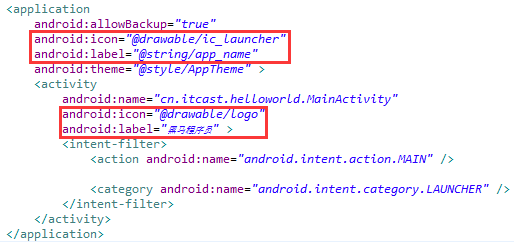
  1. 打开AndroidManifest.xml文件,修改。

img

  1. 运行。

img

img

img

  1. 在AndroidManifest.xml文件中,修改图标及应用名称时,一定要注意:如果activity标签中没有android:label及android:icon这两个属性,那么显示的就是application标签中的这两个属性的值,不存在覆盖问题。但是,如果activity标签中也有android:label及android:icon这两个属性,那么就会覆盖application标签中的android:label及android:icon属性。也就是说,显示的就是activity标签中的这两个属性的值。

  2. 图片3中的图标及应用名称会始终依据AndroidManifest.xml文件中的application标签中的android:icon和android:label两个属性值展示,因为此界面属于管理页面,要与图1和图2中的普通的Activity区分开。

示例2:修改展示内容。

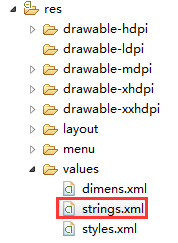
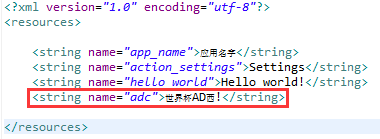
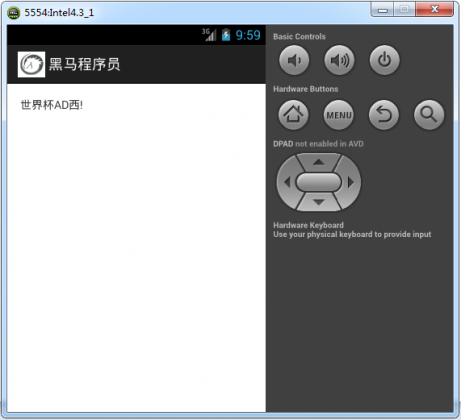
  1. 修改res中values文件夹中的strings.xml文件。

img

img

  1. 查看R.java文件,可以看到生成了相应的id。

img

img

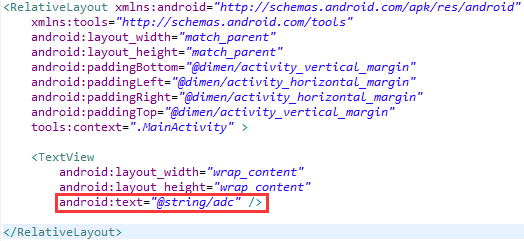
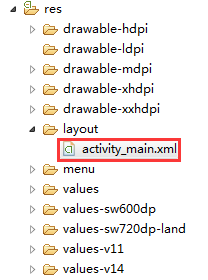
  1. 修改res中layout文件夹中的布局文件activity_mainxml。
img

img

  1. 运行。

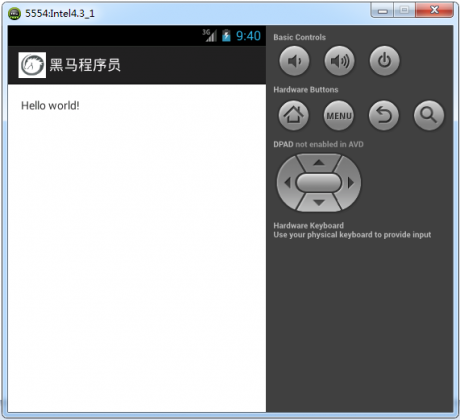
img

10. 应用打包安装过程

img

1、Android项目编译、打包成apk.apk中包含

  • .dex文件
  • resources.arsc(apk中的“配置文件”、“布局文件”、“图片”的索引)
  • uncompiled resources(未编译的资源,res文件下的资源都是不会被编译的,res文件夹下的图片、布局文件都是原封不动的打包到apk中)
  • 清单文件(AndroidManifest.xml,也会被原封不动的打包进apk中)

PS:被编译的只有.java代码

2、签名(给apk包打个数字签名)。然后再通过ADB运行到Devices emulator上,Devices指的是手机,Emulator指的是模拟器。系统判断两个应用是否属于同一款应用,首先先确认清单文件中Manifest标签的package属性值(应用程序在系统中的唯一标识)是否相同,其次判断签名是否相同。只有两个都相同,才会存在高版本覆盖低版本的情况。也就是说,只有签名相同或者包名相同,是无法覆盖的。签名是属于企业商业机密,是不能被他人获取的。签名是用一个key文件(相当于是秘钥)计算出来的一个字符串,不同的秘钥生成的字符串肯定不同,不同公司的签名也是不同的。所以,一般是无法山寨另一个公司的应用程序的。

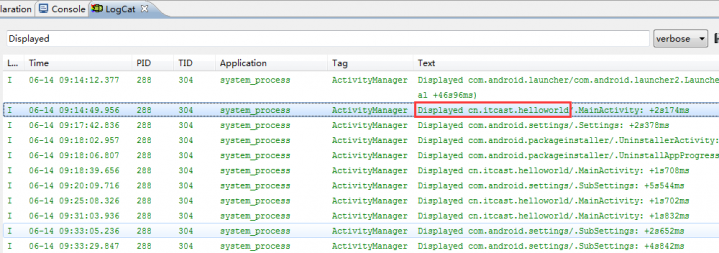
PS:1. 启动应用程序后,通过LogCat(LogCat展示的是Android模拟器的后台输出)可以看到一个应用程序的包名。
img

  1. 在Android里面,安装一个应用程序是不能选路径的。

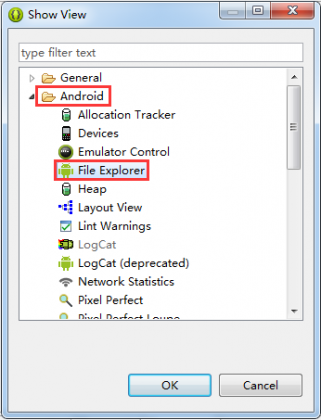
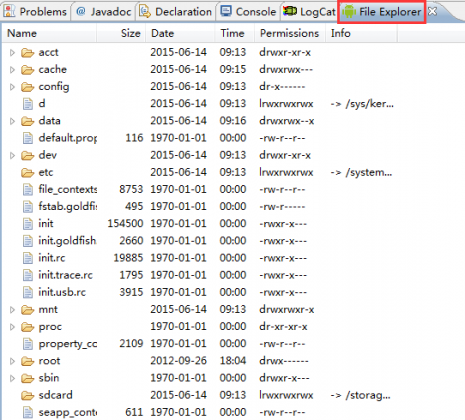
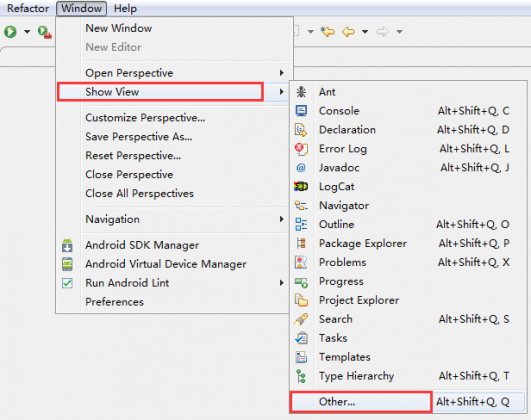
通过点击Window–>Show View–>Other…–>Android–>File Explorer,可以查看Android设备的文件目录结构。
img

img

img

  1. 所有第三方应用(也就是可以删除的项目)安装在data/app目录下,并且apk文件名是以包名命名的。

img

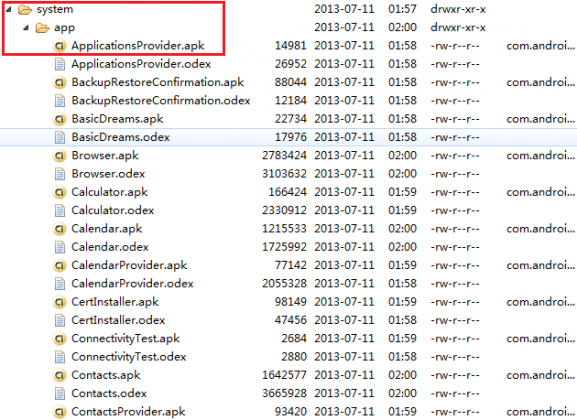
  1. 所有系统应用(不可以删除的项目)都安装在system/app目录下。

img

11. DDMS

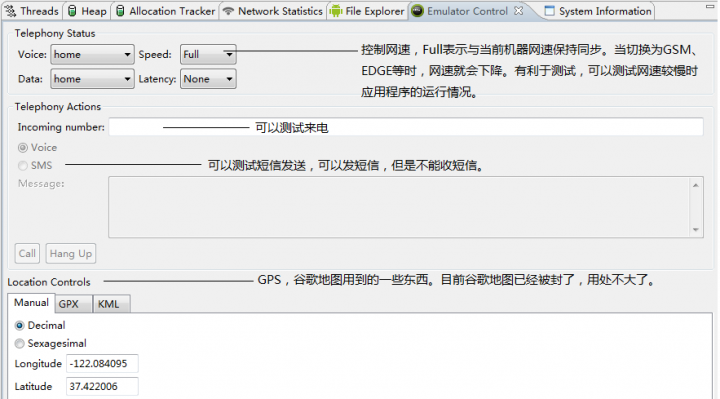
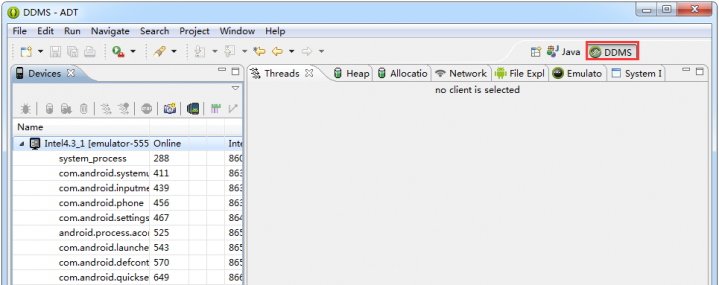
DDMS 是Dalvik Debug Monitor Service 的简称。DDMS 为IDE 和emulator 以及Android 真机架起来了一座桥梁。开发人员可以通过DDMS 看到目标机器上运行的进程/线程状态,可以看进程的heap 信息,可以查看logcat 信息,可以查看进程分配内存情况,可以向目标机发送短信以及打电话,可以向Android发送地理位置信息。下面以Eclipse 的DDMS perspective 为例简单介绍DDMS 的功能。图1-11 为DDMS透视图主界面。

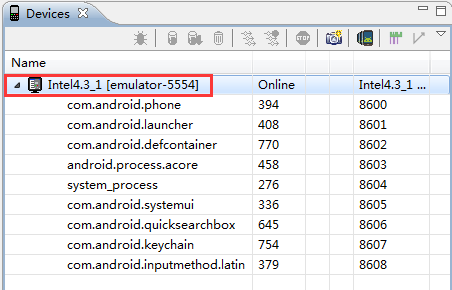
1、Devices选项卡用来查看与开发环境建立连接的Android设备,在这里是模拟器,也可以是真机。
img

2、SD卡所在的目录为storage/sdcard。

img

3、Emulator Control为控制模拟器的选项卡。

img

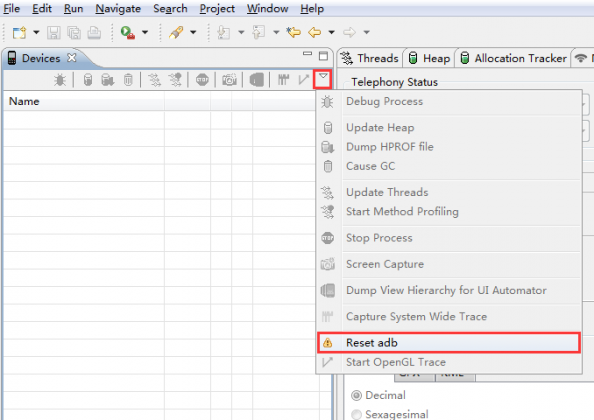
PS:1. 这里有个bug,一旦用模拟器打电话,连接就会终端。只需要点击Devices选项卡右边的小三角–>Reset ADB,重启ADB即可。
img

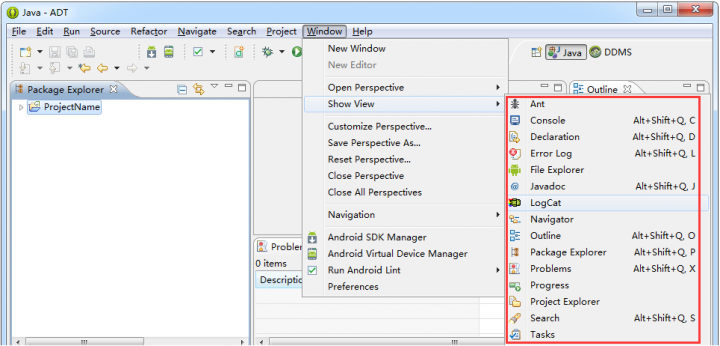
  1. DDMS中所有的选项卡都可以在Java中使用,只需要切换到Java透视图,点击Window–>show View,选择需要的选项卡即可。
img

12. 常用ADB指令

ADB,Android debug bridge Android调试桥,用于建立Android设备与开发环境的连接。
模拟器中的操作日志原本是不可能在Windows平台上输出的。但是,正是由于有了ADB,所以LogCat中才可以输出模拟器中的操作日志。
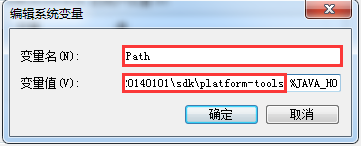
1、ADB是一个可执行的指令,在CMD中使用,使用前首先配置环境变量。
img

ADB相关指令功能介绍:

adb install xxx.apk:把一个apk安装到模拟器中。

img

img

adb uninstall 应用包名:从模拟器中卸载一个apk。

img

img

adb devices:查看当前跟eclipse建立连接的Android设备。

img

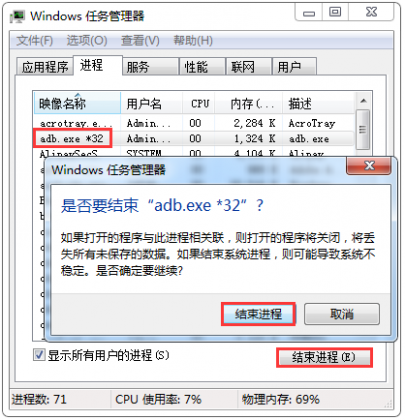
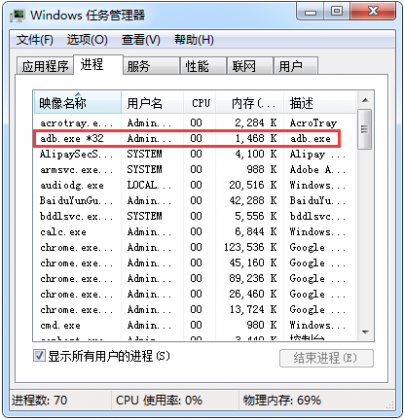
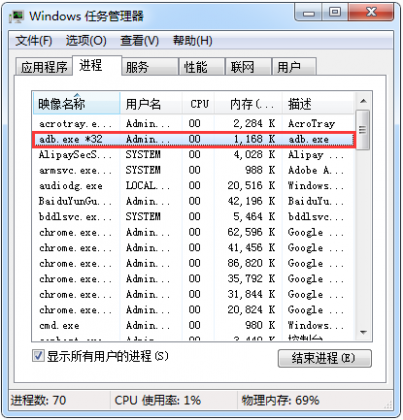
PS:adb同时也是个进程,如果这个进程挂掉了,Android设备和开发环境连接就会中断。
img

示例:

  1. 打开“任务管理器”–>点击“adb.exe”–>点击“结束进程”。

img

  1. 可以看到没有任何Android设备再连接到模拟器上了。

img

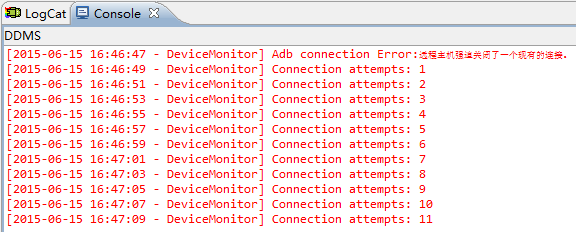
  1. 通过控制台,我们可以看到经过11秒尝试连接后,ADB连接重新恢复。

img

img

img

  1. 11秒时间太长,我们可以使用adb kill-server杀死adb进程,通过adb start-server开启adb。

img

可以看到经过不用花11秒,ADB就已经启动了。

img

  1. 通过adb devices也可以重启ADB。

img

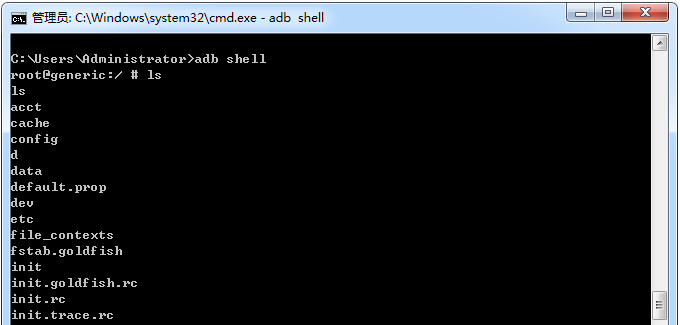
adb shell:进入Android的命令行,其实是Linux的命令行。

示例:

  1. 可以通过ls指令查看当前目录结构。

img

  1. 可以通过cd data进入data目录,然后再通过ls查看data下的目录结构。

img

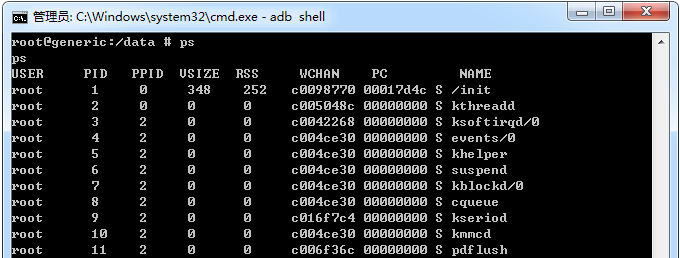
  1. 通过ps可以查看当前Android设备上运行的所有的进程,包括C进程和Java进程。
img

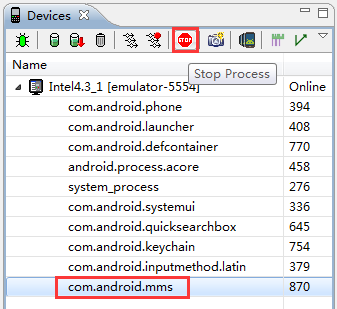
  1. 在Devices中看到的都是Java进程,可以通过“stop”按钮关掉进程。例如,关掉sms(短信)进程。
img

PS

  • 如果连接ADB时出现emulator-5554 offline,那就必须通过重启模拟器解决了。

  • 如果感觉模拟器太慢,可以通过真机测试,速度更快一些。有些测试模拟器更方便一些,因为真机有些目录结构是无法查看的。

  • 有些进程是不能关闭的,例如com.android.launcher进程,关了,Android就会崩溃。不过关闭之后,它会自动重启。

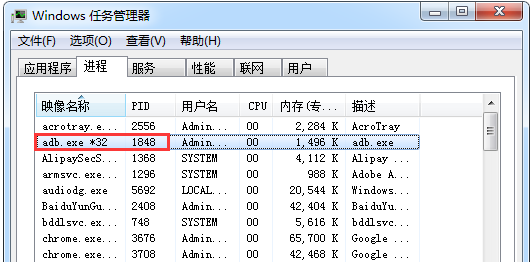
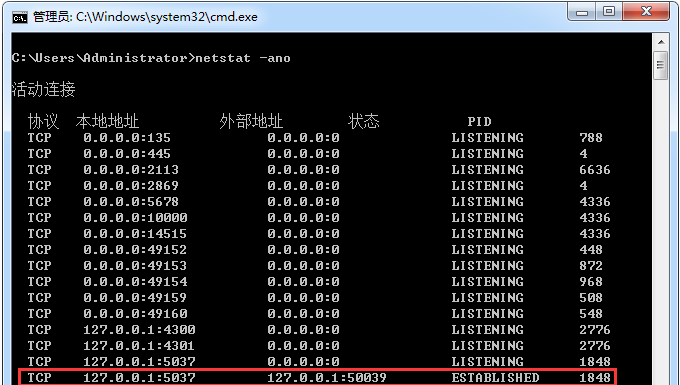
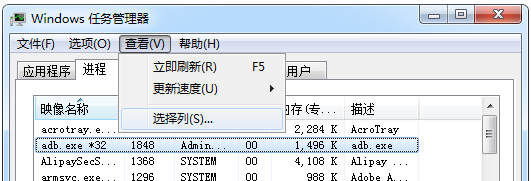
  • 某些时候,通过adb start-server启动adb会失败,可能就是5037端口被占用了。例如,360手机助手,腾讯手机管家都有可能占用此端口。可以通过netstat -ano查看是哪个进程占用了5037端口。如下图中可以看到,pid(如果看不到,那么点击任务管理器–>选择列–>勾上PID即可)为1848的进程占用了5037端口,而pid为1848的进程目前正是adb进程。如果不是adb进程,那么就直接杀掉占用5037端口的进程,然后重新启动adb进程即可。
img

img

img

img

13. 电话拨号器

拨号器只负责拨号功能,打电话功能是通过切换到打电话的应用实现的。拨号器应用可以替换,但是打电话应用是无法替代的,只能使用Android自己的打电话应用。原因是与打电话相关的API,上层应用是无法调用的,只有系统级别的应用才能调用。也就是说打电话相关的API在Android jar包中都是不存在的。但是,这些API在源码中是可以查看的。

步骤一、创建项目。
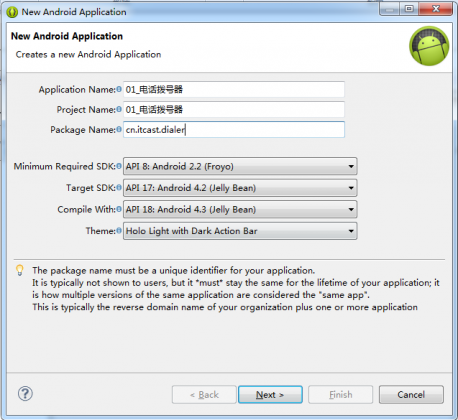
img

步骤二、写布局文件,打开res\layout\activity_main.xml,编辑。

res\layout\activity_main.xml

1
2
3
4
5
6
7
8
9
10
11
12
13
14
15
16
17
18
19
20
21
22
23
24
25
26
27
28
<LinearLayout xmlns:android="http://schemas.android.com/apk/res/android"
xmlns:tools="http://schemas.android.com/tools"
android:layout_width="match_parent"
android:layout_height="match_parent"
android:paddingBottom="@dimen/activity_vertical_margin"
android:paddingLeft="@dimen/activity_horizontal_margin"
android:paddingRight="@dimen/activity_horizontal_margin"
android:paddingTop="@dimen/activity_vertical_margin"
android:orientation="vertical"
tools:context=".MainActivity" >
<TextView
android:layout_width="wrap_content"
android:layout_height="wrap_content"
android:text="请输入号码:"
android:textSize="18sp" />
<EditText
android:id="@+id/et"
android:layout_width="match_parent"
android:layout_height="wrap_content"
android:hint="请输入号码"
/>
<Button
android:id = "@+id/bt"
android:layout_width="wrap_content"
android:layout_height="wrap_content"
android:text="拨打"
/>
</LinearLayout>

PS

  • TextView用来显示文本。

  • layout_width,layout_height是定义文本宽高的,默认值是wrap_content,表示正好能够紧紧包裹文本内容的宽高,也就是文本大小决定宽高多少。layout_width,layout_height有3个属性值,fill_parent与match_parent都是一样的,表示填充父元素。在上面的代码中也就是填充满LinearLayout(线性布局)。可以看到LinearLayout的layout_width、layout_height也是填充满父元素,也就是填充满手机屏幕。但是,并没有填充满。原因在于paddingBottom、paddingTop、paddingLeft、paddingRight等属性也决定了其与父元素(手机屏幕)的内间距大小。

  • Android不推荐使用像素,长度用dp,字体大小用sp,不要使用像素,因为像素在屏幕适配时很难做。

  • 布局类型在这里使用LinearLayout(现形布局)而不是RelativeLayout(相对布局)的原因在于线性布局不存在元素重叠的情况,而相对布局则存在。

  • LinearLayout的属性android oritation表示排列方式,有两种,vertical(垂直排列)和horizontal(水平排列)。

  • EditText用来展示输入框。

  • EditText中的属性hint表示:如果文本框中有内容,就不显示提示内容;如果文本框没有内容,就会显示提示内容。

步骤三、写java代码,打开src\cn.itcast.dialer\MainActivity.java,编辑。

src\cn.itcast.dialer\MainActivity.java

1
2
3
4
5
6
7
8
9
10
11
12
13
14
15
16
17
18
19
20
21
22
23
24
25
26
27
28
29
30
31
32
33
34
35
36
37
38
39
40
41
42
43
package cn.itcast.dialer;
import android.app.Activity;
import android.content.Intent;
import android.net.Uri;
import android.os.Bundle;
import android.view.Menu;
import android.view.View;
import android.view.View.OnClickListener;
import android.widget.Button;
import android.widget.EditText;
public class MainActivity extends Activity {
//onCreate方法是被系统在创建Activity时调用的。
@Override
protected void onCreate(Bundle savedInstanceState) {
super.onCreate(savedInstanceState);
setContentView(R.layout.activity_main);
//设置按钮点击侦听
//通过资源id来获取指定的组件的对象
Button bt = (Button) findViewById(R.id.bt);
//设置点击侦听
bt.setOnClickListener(new MyListener());
}
//这里的OnClickListener的全名为:android.view.View.OnClickListener
class MyListener implements OnClickListener {
//按钮按下时,此方法被调用
@Override
public void onClick(View v) {
//findViewById返回的是布局所有组件的父类android.view.View,需要强转
EditText et = (EditText) findViewById(R.id.et);
//拿到用户输入的号码
String phone = et.getText().toString();
//告诉系统,我们的动作
//1. 创建意图对象
Intent intent = new Intent();
//2. 设置动作
intent.setAction(intent.ACTION_CALL);
//3. 设置号码,通过Uri转
intent.setData(Uri.parse("tel:" + phone));
//4. 把动作告诉系统,开启打电话应用的Activity
startActivity(intent);
}
}
}

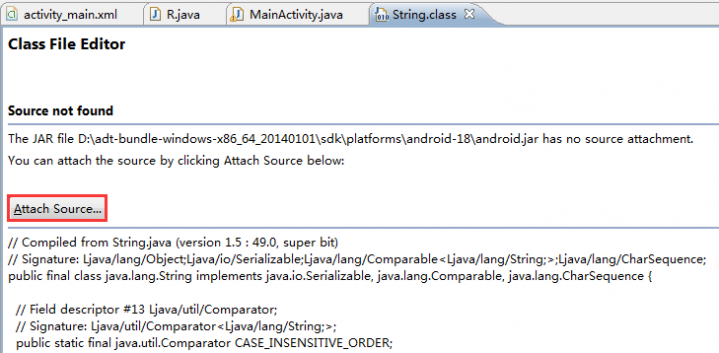
14. 关联源码的方法:

  1. Ctrl+左键,点击某个类,再点击Attach Source按钮。

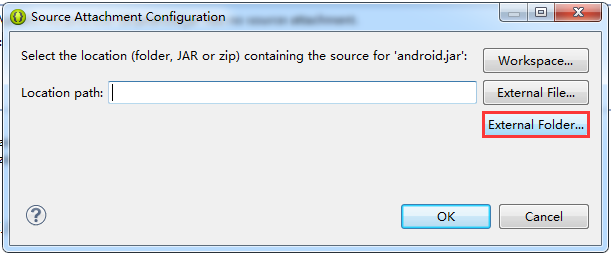
img

  1. 点击External Folder…。

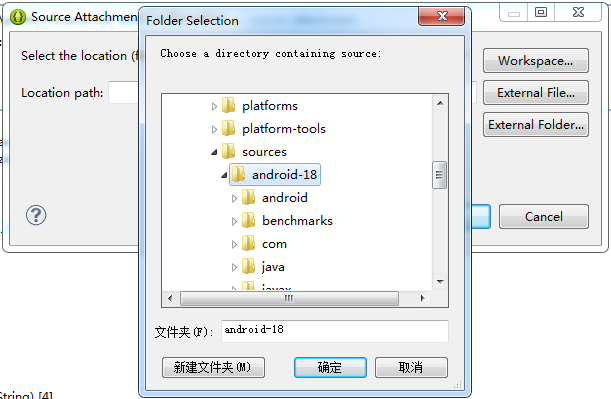
img

  1. 选择关联sdk\sources\android-18。

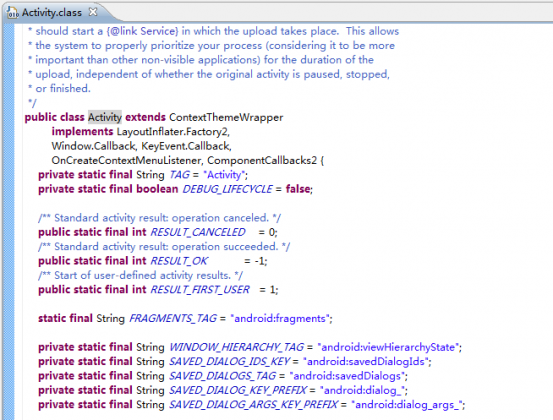
img

看到源码,则说明关联成功。

img

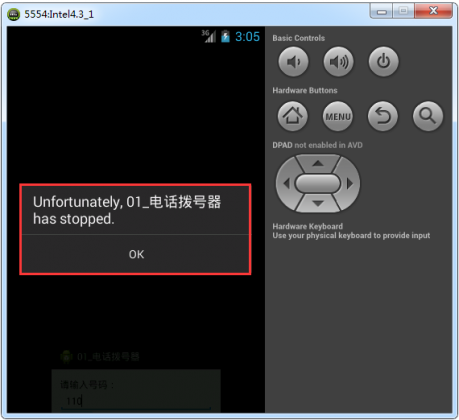
步骤四、试运行,可以看到出现了安全异常,没有权限。因为打电话是需要费用的,所以需要出示权限。

img

img

img

步骤五、添加权限。

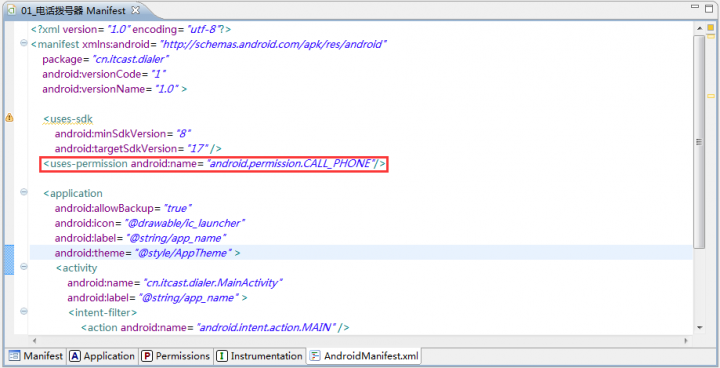
打开清单文件AndroidManifest.xml,使用可视化方式,点击Permission选项卡–>Add–>Uses Permission。
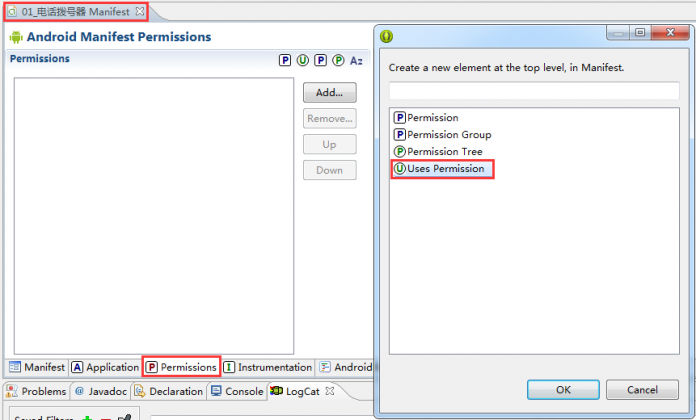
img

添加Uses Permission的属性“android.permission.CALL_PHONE”,Ctrl+S保存。

img

可以看到清单文件代码中生成了如下代码。

img

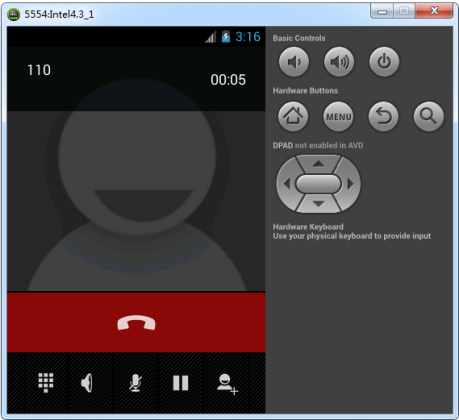
步骤六、重新运行,可以看到,拨打成功。

img

15. 点击事件的实现

代码:三种java写法。

res\layout\activity_main.xml

1
2
3
4
5
6
7
8
9
10
11
12
13
14
15
16
17
18
19
20
21
22
23
24
<LinearLayout xmlns:android="http://schemas.android.com/apk/res/android"
xmlns:tools="http://schemas.android.com/tools"
android:layout_width="match_parent"
android:layout_height="match_parent"
android:paddingBottom="@dimen/activity_vertical_margin"
android:paddingLeft="@dimen/activity_horizontal_margin"
android:paddingRight="@dimen/activity_horizontal_margin"
android:paddingTop="@dimen/activity_vertical_margin"
tools:context=".MainActivity"
android:orientation="vertical">
<Button
android:id="@+id/bt_iq"
android:layout_width="wrap_content"
android:layout_height="wrap_content"
android:text="点我一下,云鹤智商-10" />
<Button
android:id="@+id/bt_eq"
android:layout_width="wrap_content"
android:layout_height="wrap_content"
android:text="点我一下,云鹤情商-10" />
</LinearLayout>

src\cn.itcast.clickevent\MainActivity.java

1
2
3
4
5
6
7
8
9
10
11
12
13
14
15
16
17
18
19
20
21
22
23
24
25
26
27
28
29
30
31
32
33
34
35
36
37
package cn.itcast.clickevent;
import android.app.Activity;
import android.os.Bundle;
import android.view.View;
import android.view.View.OnClickListener;
import android.widget.Button;
public class MainActivity extends Activity implements OnClickListener{
@Override
protected void onCreate(Bundle savedInstanceState) {
super.onCreate(savedInstanceState);
setContentView(R.layout.activity_main);
Button bt_iq = (Button) findViewById(R.id.bt_iq);
Button bt_eq = (Button) findViewById(R.id.bt_eq);
//第一种:Java写法,内部类实现OnClickListener接口,上个案例中就是按照内部类的方法实现的。
//第二种:Java写法,匿名内部类实现OnClickListener接口。
bt_iq.setOnClickListener(new OnClickListener() {
@Override
public void onClick(View v) {
System.out.println("点我一下,云鹤智商-10");
}
});
bt_eq.setOnClickListener(this);
}
//第三种:Java写法,当前类实现OnClickListener接口。
@Override
public void onClick(View v) {
System.out.println("点我一下,云鹤情商-10");
}
}

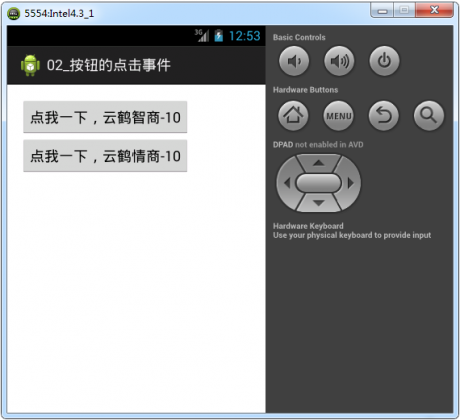
运行结果:

img

img

代码:Android写法。

res\layout\activity_main.xml

1
2
3
4
5
6
7
8
9
10
11
12
13
14
15
16
17
18
19
20
21
22
23
24
25
26
27
28
29
30
31
32
33
<LinearLayout xmlns:android="http://schemas.android.com/apk/res/android"
xmlns:tools="http://schemas.android.com/tools"
android:layout_width="match_parent"
android:layout_height="match_parent"
android:paddingBottom="@dimen/activity_vertical_margin"
android:paddingLeft="@dimen/activity_horizontal_margin"
android:paddingRight="@dimen/activity_horizontal_margin"
android:paddingTop="@dimen/activity_vertical_margin"
tools:context=".MainActivity"
android:orientation="vertical">
<Button
android:id="@+id/bt1"
android:layout_width="wrap_content"
android:layout_height="wrap_content"
android:text="按钮1"
android:onClick="click1"/>
<Button
android:id="@+id/bt2"
android:layout_width="wrap_content"
android:layout_height="wrap_content"
android:text="按钮2"
android:onClick="click1" />
<Button
android:id="@+id/bt3"
android:layout_width="wrap_content"
android:layout_height="wrap_content"
android:text="按钮3"
android:onClick="click1" />
</LinearLayout>

src\cn.itcast.clickevent\MainActivity.java

1
2
3
4
5
6
7
8
9
10
11
12
13
14
15
16
17
18
19
20
21
22
23
24
25
26
27
28
29
30
31
32
33
34
35
36
package cn.itcast.clickevent;
import android.app.Activity;
import android.os.Bundle;
import android.view.View;
public class MainActivity extends Activity {
@Override
protected void onCreate(Bundle savedInstanceState) {
super.onCreate(savedInstanceState);
setContentView(R.layout.activity_main);
}
//Android写法。
//注意:1. 在Activity中定义。
// 2. 方法名必须与Button的onClick属性值相同。
// 3. 返回值必须为void。
// 4. 参数必须为View类型对象。系统调用此方法时,会把触发的对象传进来。这里就是按钮,Button是View的子类。
// 5. 多个按钮Button的onClick属性值可以相同,点击任何一个按钮都会调用相同的方法。通过id可以判断用户按下的是哪一个按钮。
public void click1(View v) {
int id = v.getId();
switch(id){
case R.id.bt1:
System.out.println("按钮1被按下");
break;
case R.id.bt2:
System.out.println("按钮2被按下");
break;
case R.id.bt3:
System.out.println("按钮3被按下");
break;
}
}
}

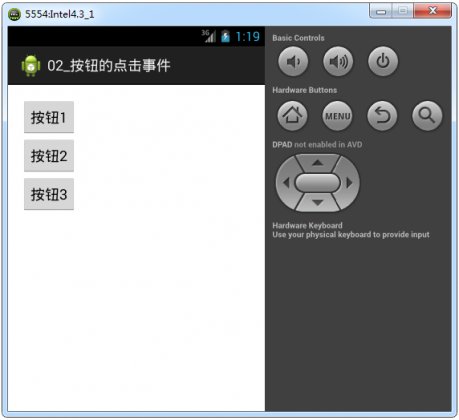
运行结果:

img

img

16. 短信发送器

代码:res\layout\activity_main.xml

1
2
3
4
5
6
7
8
9
10
11
12
13
14
15
16
17
18
19
20
21
22
23
24
25
26
27
28
29
30
31
32
33
34
<LinearLayout xmlns:android="http://schemas.android.com/apk/res/android"
xmlns:tools="http://schemas.android.com/tools"
android:layout_width="match_parent"
android:layout_height="match_parent"
android:paddingBottom="@dimen/activity_vertical_margin"
android:paddingLeft="@dimen/activity_horizontal_margin"
android:paddingRight="@dimen/activity_horizontal_margin"
android:paddingTop="@dimen/activity_vertical_margin"
tools:context=".MainActivity"
android:orientation="vertical">
<!-- android:inputType="phone"表示只能输入电话号码 -->
<EditText
android:id="@+id/et_phone"
android:layout_width="wrap_content"
android:layout_height="wrap_content"
android:hint="请输入号码"
android:inputType="phone" />
<!-- android:lines="5"表示只能输入5行 -->
<EditText
android:id="@+id/et_content"
android:layout_width="wrap_content"
android:layout_height="wrap_content"
android:hint="请输入内容"
android:lines="5"/>
<Button
android:layout_width="wrap_content"
android:layout_height="wrap_content"
android:text="发送"
android:onClick="send"/>
</LinearLayout>

src\cn.itcast.smssender\MainActivity.java

1
2
3
4
5
6
7
8
9
10
11
12
13
14
15
16
17
18
19
20
21
22
23
24
25
26
27
28
29
30
31
32
33
34
35
36
37
38
39
40
41
42
43
44
package cn.itcast.smssender;
import java.util.ArrayList;
import android.app.Activity;
import android.os.Bundle;
import android.telephony.SmsManager;
import android.view.View;
import android.widget.EditText;
public class MainActivity extends Activity {
@Override
protected void onCreate(Bundle savedInstanceState) {
super.onCreate(savedInstanceState);
setContentView(R.layout.activity_main);
}
public void send(View v) {
//获取用户输入的号码和数据
EditText et_phone = (EditText) findViewById(R.id.et_phone);
EditText et_content = (EditText) findViewById(R.id.et_content);
String phone = et_phone.getText().toString();
String content = et_content.getText().toString();
//获取发送短信的API
//SmsManager要使用android.telephony包内的,不要使用android.telephony.gsm包内的,已过时。
SmsManager sm = SmsManager.getDefault();
//如果短信过长,发布出去,可以把长短信拆分成若干条短短信。
ArrayList<String> smss = sm.divideMessage(content);
for(String str : smss){
//第一个参数表示对方号码。
//第二个参数表示短信服务中心的号码,可以传null,表示使用默认的短信服务中心地址。
//第三个参数表示短信内容。
//第四个参数表示广播,如果不传null,短信发送成功或失败时,会给予回执信息。
//第五个参数表示如果对方成功接收信息了,会给予回执信息。
sm.sendTextMessage(phone, null, str, null, null);
}
}
}

添加权限:

img

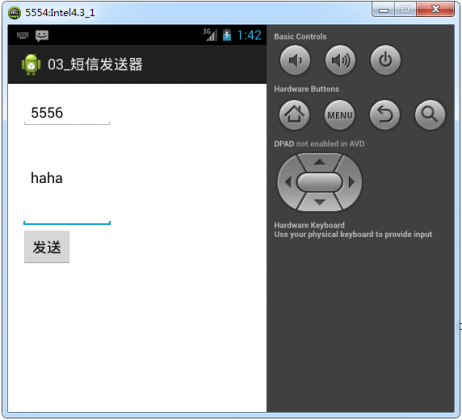
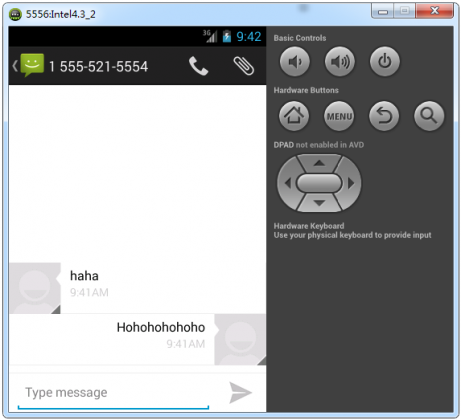
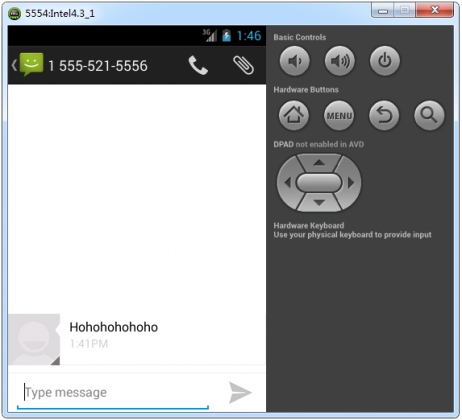
运行结果:

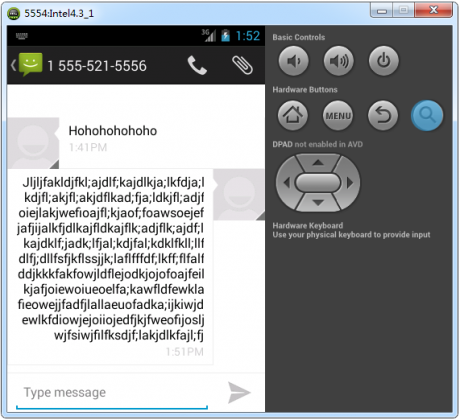
  1. 发送一般短信结果。

img

img

img

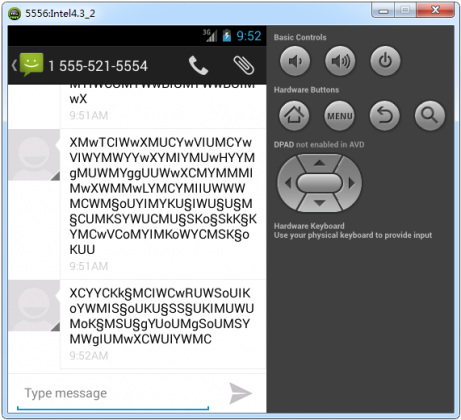
  1. 发送超长短信结果。

img

img

17. dp和px

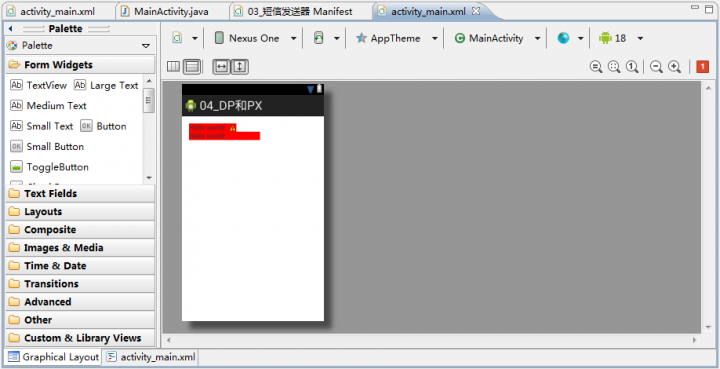
dp最终显示长度多少是根据屏幕密度来换算的,屏幕越大,1dp就能显示更长的像素。

320x480屏幕上,1dp=1px,160dp=160px,正好是屏幕宽度的一般。

480x800屏幕上,1dp=1.5px,160dp=240px,正好是屏幕宽度的一般

sp与dp类似,只是sp用于字体大小,dp用于长度大小。

res\layout\activity_main.xml

1
2
3
4
5
6
7
8
9
10
11
12
13
14
15
16
17
18
19
20
21
22
23
24
25
<LinearLayout xmlns:android="http://schemas.android.com/apk/res/android"
xmlns:tools="http://schemas.android.com/tools"
android:layout_width="match_parent"
android:layout_height="match_parent"
android:paddingBottom="@dimen/activity_vertical_margin"
android:paddingLeft="@dimen/activity_horizontal_margin"
android:paddingRight="@dimen/activity_horizontal_margin"
android:paddingTop="@dimen/activity_vertical_margin"
tools:context=".MainActivity" >
<TextView
android:layout_width="160px"
android:layout_height="wrap_content"
android:text="@string/hello_world"
android:background="#ff0000"
android:textSize="15sp"/>
<TextView
android:layout_width="160dp"
android:layout_height="wrap_content"
android:text="@string/hello_world"
android:background="#ff0000"
android:textSize="15sp"/>
</LinearLayout>

运行结果:

320x480屏幕下显示:

img

480x800屏幕下显示:

img

18. 布局介绍

为适应各种界面风格,满足开发的需要,Android提供了6种布局方式

  • LinearLayout(线性布局)
  • RelativeLayout(相对布局)
  • FrameLayout(帧布局)
  • TableLayout(表格布局)
  • AbsoluteLayout(绝对布局)
  • GridLayout(网格布局)

通过这6种布局我们可以做出来各种复杂的UI效果。

18.1 线性布局LinearLayout

  • orientation属性是指定线性布局的排列方向:
  • horizontal 水平
  • vertical 垂直

示例1:res\layout\activity_main.xml

1
2
3
4
5
6
7
8
9
10
11
12
13
14
15
16
17
18
19
20
21
22
23
24
<LinearLayout xmlns:android="http://schemas.android.com/apk/res/android"
xmlns:tools="http://schemas.android.com/tools"
android:layout_width="match_parent"
android:layout_height="match_parent"
tools:context=".MainActivity"
android:orientation="vertical"
>
<TextView
android:layout_width="wrap_content"
android:layout_height="wrap_content"
android:text="第一个" />
<TextView
android:layout_width="wrap_content"
android:layout_height="wrap_content"
android:text="第二个" />
<TextView
android:layout_width="wrap_content"
android:layout_height="wrap_content"
android:text="第三个" />
</LinearLayout>

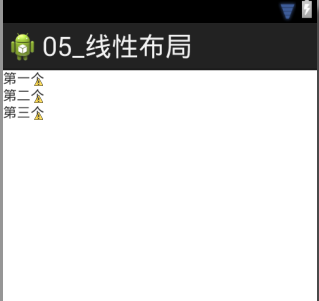
运行结果:

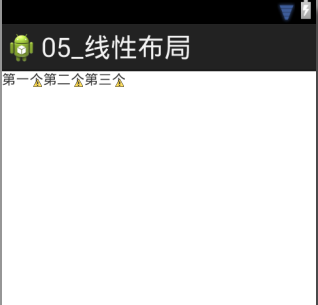
  1. 设置android: orientation为vertical结果。

img

  1. 设置android: orientation为horizontal结果。

img

gravity属性是指定当前控件内容显示位置:

  • left 左边
  • right 右边
  • top 上边
  • bottom 底边

示例2:res\layout\activity_main.xml

1
2
3
4
5
6
7
8
9
10
11
12
13
14
15
16
17
18
19
20
21
22
23
<LinearLayout xmlns:android="http://schemas.android.com/apk/res/android"
xmlns:tools="http://schemas.android.com/tools"
android:layout_width="match_parent"
android:layout_height="match_parent"
tools:context=".MainActivity"
android:orientation="vertical"
>
<TextView
android:layout_width="match_parent"
android:layout_height="wrap_content"
android:gravity="center_horizontal"
android:text="第一个"
android:background="#ff0000"/>
<TextView
android:layout_width="wrap_content"
android:layout_height="wrap_content"
android:gravity="center_horizontal"
android:text="第二个"
android:background="#00ff00"/>
</LinearLayout>

运行结果:

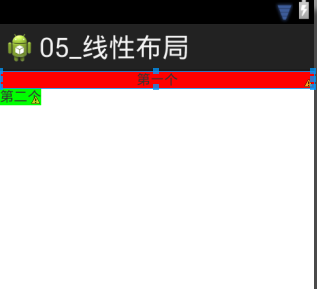
设置第一个TextView的android:layout_width属性值为match_parent,由于父组件足够宽,因此设置第一个TextView的android:gravity属性值为center_horizontal,可以看到控件内容居中。但是,第二个TextView的父组件宽高都是由包裹着内容决定的,所以,设置第二个TextView的android:gravity起不到任何效果。
img

layout_gravity属性是指定当前控件在父元素的位置:

  • left 左边
  • right 右边
  • top 上边
  • bottom 底边

示例3:res\layout\activity_main.xml

1
2
3
4
5
6
7
8
9
10
11
12
13
14
15
16
17
18
19
20
21
22
23
24
25
26
27
28
29
<LinearLayout xmlns:android="http://schemas.android.com/apk/res/android"
xmlns:tools="http://schemas.android.com/tools"
android:layout_width="match_parent"
android:layout_height="match_parent"
tools:context=".MainActivity"
android:orientation="vertical"
>
<TextView
android:layout_width="wrap_content"
android:layout_height="wrap_content"
android:text="第一个"
android:background="#ff0000"
android:layout_gravity="right"/>
<TextView
android:layout_width="wrap_content"
android:layout_height="wrap_content"
android:text="第二个"
android:background="#00ff00"
android:layout_gravity="center_horizontal"/>
<TextView
android:layout_width="wrap_content"
android:layout_height="wrap_content"
android:text="第三个"
android:layout_gravity="bottom"/>
</LinearLayout>

运行结果:
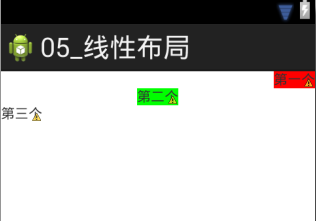
设置第一个TextView的android:layout_gravity属性值为right,设置第二个TextView的android:layout_gravity属性值为center_horizontal,设置第三个TextView的android:layout_gravity属性值为bottom。然后会发现,第三个TextView的设置将不会有任何效果。因为,

在线性布局中,竖直排列(vertical)时,顶部、底部、竖直居中对齐都无效。水平排列(horizontal)时,左右对齐,水平居中对齐都无效。
img

layout_weightSum(权重)属性是把线性布局中剩余空间分成N份。
layout_weight (权重)属性是指定当前控件在父元素(线性布局)中占N份。

示例4:res\layout\activity_main.xml

1
2
3
4
5
6
7
8
9
10
11
12
13
14
15
16
17
18
19
20
21
22
23
24
25
26
27
<LinearLayout xmlns:android="http://schemas.android.com/apk/res/android"
xmlns:tools="http://schemas.android.com/tools"
android:layout_width="match_parent"
android:layout_height="match_parent"
tools:context=".MainActivity"
android:orientation="horizontal"
>
<TextView
android:layout_width="match_parent"
android:layout_height="wrap_content"
android:text="第一个"
android:background="#ff0000"/>
<TextView
android:layout_width="wrap_content"
android:layout_height="wrap_content"
android:text="第二个"
android:background="#00ff00"/>
<TextView
android:layout_width="match_parent"
android:layout_height="wrap_content"
android:text="第三个"
android:background="#0000ff"/>
</LinearLayout>

运行结果:

水平排列(horizontal)时,设置第一个TextView的android:layout_width属性值为match_parent,将会发现第二个、第三个TextView被第一个TextView完全挤出去,看不到了。这时候就需要使用权重来解决这个问题。

img

示例5:res\layout\activity_main.xml

1
2
3
4
5
6
7
8
9
10
11
12
13
14
15
16
17
18
19
20
21
22
23
24
<LinearLayout xmlns:android="http://schemas.android.com/apk/res/android"
xmlns:tools="http://schemas.android.com/tools"
android:layout_width="match_parent"
android:layout_height="match_parent"
tools:context=".MainActivity"
android:orientation="horizontal"
android:weightSum="2"
>
<TextView
android:layout_width="100dp"
android:layout_height="wrap_content"
android:text="第一个"
android:background="#ff0000"
android:layout_weight="1"/>
<TextView
android:layout_width="100dp"
android:layout_height="wrap_content"
android:text="第二个"
android:background="#00ff00"
android:layout_weight="1"/>
</LinearLayout>

运行结果:

首先,将第一个、第二个TextView的android:layout_width的属性值分别设置为100dp。然后,通过为LinearLayout标签设置android:layout_weightSum属性值,把屏幕的总宽度权重设置为2,每个TextView的宽度权重通过android:layout_weight属性设置为1,也就是平均分配。
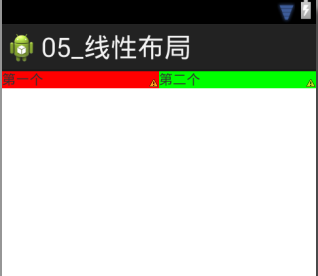
img

但是,如果将第一个TextView的android:layout_width属性值设置为100dp,将第二个TextView的android:layout_width属性值设置为50dp,结果如下。

img

说明:android:weightSum及android:weight的属性值设置,针对的是剩余空间的分配。

第一次分配情况如下:

img

第二次分配情况如下:

img

所以,当排列为水平排列(horizontal),利用权重进行分配的时候,一定要搭配将android:layout_width属性值设置为0dp来使用,这样很容易计算。同理,当排列为垂直排列(vertical),在利用权重进行分配的时候,一定要搭配将android:layout_height属性值设置为0dp来使用。

PS:

  • android:weightSum是可以不写的,上例中,如果第一个TextView的android:weight属性值设置为1,第二个TextView的android:weight属性值设置为2,那么weightSum即为3,两个TextView按照1:2分配。但是,如果weightSum设置为4,相当于把宽度切成四份,前面3份,两个TextView按照1:2分配,第4块不分配。

  • TextView的android:weight属性如果不写,相当于android:weight的属性值为0,也就是不会分配到剩余空间任何部分。此时,如果android:layout_width属性值设置为0dp,那么就会报错。因为,此TextView已经无法显示出来了。

visibility属性是控制布局是否显示:

  • visible 显示
  • invisible 不显示但占空间
  • gone 隐藏

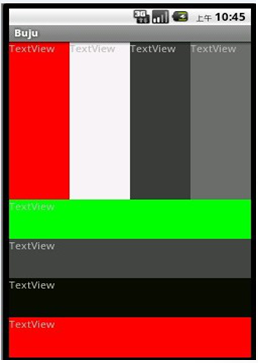
练习:做出如下效果的布局。

img

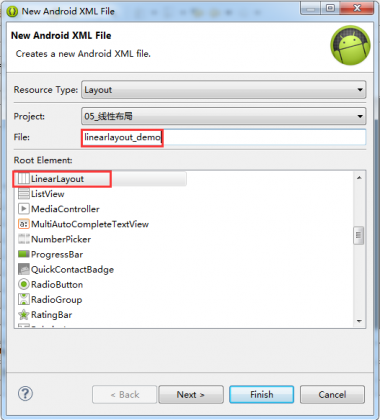
实现:右击res/layout文件夹–>点击New–>Android XML File–>选择LinearLayout–>取一个名字。

img

img

代码:res\layout\linearlayout_demo.xml

1
2
3
4
5
6
7
8
9
10
11
12
13
14
15
16
17
18
19
20
21
22
23
24
25
26
27
28
29
30
31
32
33
34
35
36
37
38
39
40
41
42
43
44
45
46
47
48
49
50
51
52
53
54
55
56
57
58
59
60
61
62
63
64
65
66
67
68
69
70
71
72
73
74
75
76
77
78
79
<?xml version="1.0" encoding="utf-8"?>
<LinearLayout xmlns:android="http://schemas.android.com/apk/res/android"
android:layout_width="match_parent"
android:layout_height="match_parent"
android:orientation="vertical" >
<LinearLayout
android:layout_width="match_parent"
android:layout_height="0dp"
android:layout_weight="1"
android:orientation="horizontal">
<TextView
android:layout_width="0dp"
android:layout_height="match_parent"
android:layout_weight="1"
android:background="#000000"
/>
<TextView
android:layout_width="0dp"
android:layout_height="match_parent"
android:layout_weight="1"
android:background="#ffffff"
/>
<TextView
android:layout_width="0dp"
android:layout_height="match_parent"
android:layout_weight="1"
android:background="#ff0000"
/>
<TextView
android:layout_width="0dp"
android:layout_height="match_parent"
android:layout_weight="1"
android:background="@android:color/darker_gray"
/>
</LinearLayout>
<LinearLayout
android:layout_width="match_parent"
android:layout_height="0dp"
android:layout_weight="1"
android:orientation="vertical">
<TextView
android:layout_width="match_parent"
android:layout_height="0dp"
android:layout_weight="1"
android:background="#00ffff"
/>
<TextView
android:layout_width="match_parent"
android:layout_height="0dp"
android:layout_weight="1"
android:background="#ffffff"
/>
<TextView
android:layout_width="match_parent"
android:layout_height="0dp"
android:layout_weight="1"
android:background="#ff0000"
/>
<TextView
android:layout_width="match_parent"
android:layout_height="0dp"
android:layout_weight="1"
android:background="@android:color/darker_gray"
/>
</LinearLayout>
</LinearLayout>

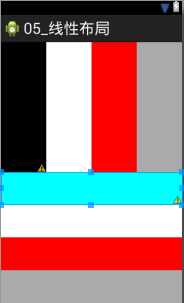
运行结果:

img

PS:@android:color/darker_gray表示引用Android定义好的颜色资源id。

坚持原创技术分享,您的支持将鼓励我继续创作!